Transforming a Miniature Mac Clock into a Functional Raspberry Pi Computer
In the realm of tech modifications, enthusiasts continually push the boundaries of creativity and functionality. A recent project by the YouTube channel This Does Not Compute exemplifies this spirit by converting a four-inch, classic Mac-styled alarm clock into a fully operational computer. This endeavor not only pays homage to Apple’s iconic design but also showcases the versatility of modern hardware components.
The Inspiration Behind the Project
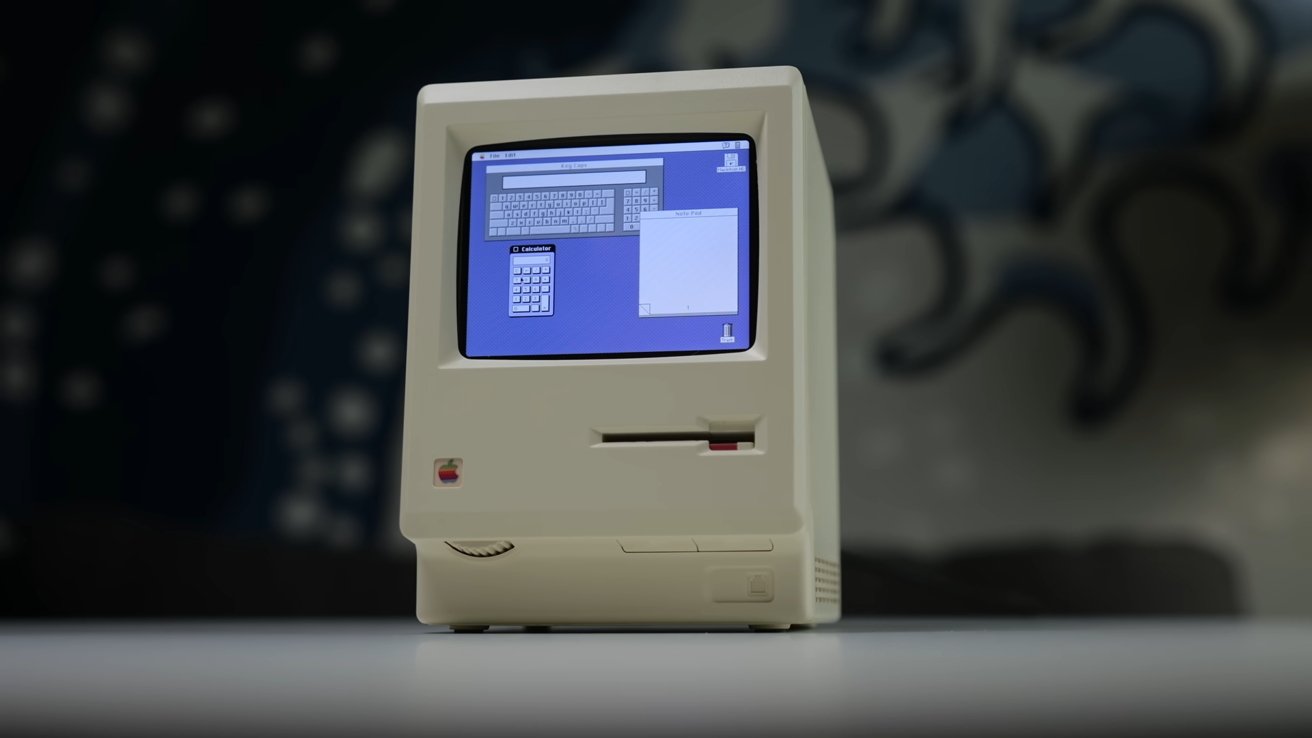
The foundation of this project is the RayCue Maclock, a compact alarm clock that meticulously replicates the exterior of the original Macintosh. Standing at approximately four inches tall, the Maclock’s design captures the essence of Apple’s early computers, making it an ideal candidate for a functional transformation.
Essential Components and Tools
To bring this miniature Mac to life, the following hardware components were utilized:
– Raspberry Pi Zero 2 W: A compact and efficient single-board computer that serves as the project’s core.
– Waveshare 2.8 LCD Screen: A small display that fits seamlessly into the Maclock’s frame.
– 32GB microSD Card: Provides ample storage for the operating system and applications.
– 3D-Printed Screen Bracket: Custom-designed to securely hold the LCD screen within the Maclock’s chassis.
Additionally, basic soldering skills and tools are necessary to integrate these components effectively.
Step-by-Step Transformation Process
1. Disassembling the Maclock: Carefully open the Maclock’s casing to access its internal structure. This step requires precision to avoid damaging the exterior.
2. Installing the LCD Screen: Utilize the 3D-printed bracket to mount the Waveshare 2.8 LCD screen inside the Maclock, ensuring it aligns with the front display area.
3. Integrating the Raspberry Pi: Position the Raspberry Pi Zero 2 W within the casing, connecting it to the LCD screen and ensuring all components fit snugly.
4. Software Configuration: Load a compatible operating system onto the 32GB microSD card. Emulation software can be installed to replicate the classic Mac OS experience, allowing the device to run vintage applications and games.
5. Final Assembly: Once all components are securely in place and connections are verified, reassemble the Maclock’s casing.
Potential Enhancements and Future Possibilities
The project’s creator, Colin, acknowledges that there is room for further innovation. For instance, modifying the non-functional floppy disk slot to serve as a power switch or an SD card reader could enhance the device’s functionality. Such additions would not only increase the project’s complexity but also its practicality.
Community Engagement and Resources
For those interested in replicating or expanding upon this project, This Does Not Compute has provided comprehensive documentation and resources on their GitHub repository. This includes detailed instructions, software configurations, and 3D printing files for the screen bracket.
Broader Implications and Similar Endeavors
This project is part of a larger trend where enthusiasts breathe new life into vintage designs using modern technology. Similar initiatives include:
– Building a Classic Mac Plus Clone: An engineer constructed a working replica of the Mac Plus using contemporary components, demonstrating the enduring appeal of Apple’s early designs.
– 3D-Printed Mini Macintosh: Enthusiasts have created functional, miniature versions of classic Macs through 3D printing and Raspberry Pi integration, blending nostalgia with modern computing capabilities.
Conclusion
The transformation of a miniature Mac-styled alarm clock into a functional Raspberry Pi computer is a testament to the ingenuity and passion of the tech community. By merging classic design with modern technology, such projects not only honor the legacy of iconic devices but also inspire further innovation and creativity.