With the release of iOS 18.2, Apple has introduced a significant enhancement to its Mail application: the automatic categorization of incoming emails. This feature aims to streamline your inbox by sorting messages into four distinct categories: Primary, Transactions, Updates, and Promotions. Understanding how to effectively use and customize this feature can greatly improve your email management experience.
Understanding the Four Categories
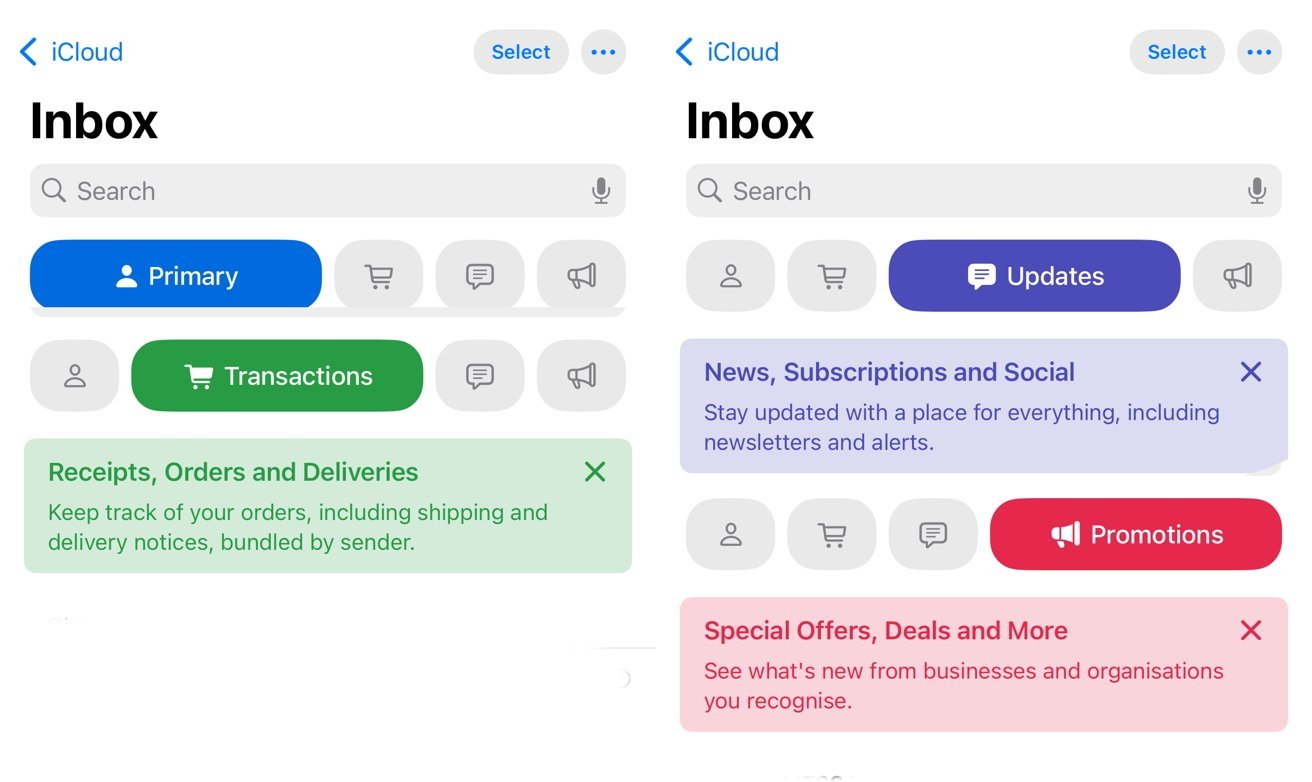
1. Primary: This category encompasses emails from your contacts, time-sensitive notifications, and messages from individuals rather than companies. It’s designed to highlight communications that are most relevant and urgent to you.
2. Transactions: Here, you’ll find receipts, order confirmations, and other transactional emails. This category helps you keep track of your purchases and financial activities.
3. Updates: This section includes newsletters, social media notifications, and subscription updates. It’s tailored to keep you informed about various services and platforms you engage with.
4. Promotions: Marketing emails, special offers, and sales-related messages are sorted into this category, allowing you to access promotional content without cluttering your main inbox.
Activating and Navigating the Categories
Upon updating to iOS 18.2, the Mail app automatically enables the categorization feature. At the top of your inbox, you’ll notice tabs representing each category. Tapping on a tab will display the emails sorted under that category. If you prefer to view all emails in a unified list, you can switch to the All Mail view by tapping the currently selected category or swiping across the categories.
Customizing the Categorization
While the automatic sorting is designed to be intuitive, you might find instances where an email is placed in an unintended category. To correct this:
1. Reassigning Emails: Open the email in question, tap the Move option, and select the desired category. This action helps the Mail app learn your preferences over time.
2. Managing Grouped Emails: In categories like Updates and Promotions, emails from the same sender are often grouped together. If you prefer individual listings, you can adjust this by:
– Opening the Mail app.
– Tapping the three-dot menu at the top-right corner.
– Selecting View Options.
– Toggling off Group by Sender.
Disabling the Categories Feature
If you prefer the traditional inbox view without automatic categorization:
1. Open the Mail app.
2. Tap the three-dot menu at the top-right corner.
3. Choose View Options.
4. Select List View to revert to the standard inbox layout.
Leveraging Apple Intelligence for Enhanced Email Management
For users with devices supporting Apple Intelligence, the Mail app offers additional functionalities:
– Summarized Previews: Time-sensitive emails in the Primary category may display concise summaries, allowing you to grasp the essence of the message at a glance.
– Priority Display: Urgent emails are prioritized at the top of the Primary category, ensuring you don’t miss critical communications.
Fine-Tuning Apple Intelligence Settings
To customize how Apple Intelligence interacts with your Mail app:
1. Open the Settings app.
2. Scroll down and tap on Mail.
3. Select Apple Intelligence & Siri.
4. Adjust the settings according to your preferences, such as enabling or disabling features like Show Priority.
Conclusion
The introduction of email categorization in iOS 18.2’s Mail app is a testament to Apple’s commitment to enhancing user experience through intelligent design. By understanding and customizing this feature, you can achieve a more organized and efficient email management system tailored to your needs.